This post contains affiliate links. As an Amazon Associate I earn from qualifying purchases.
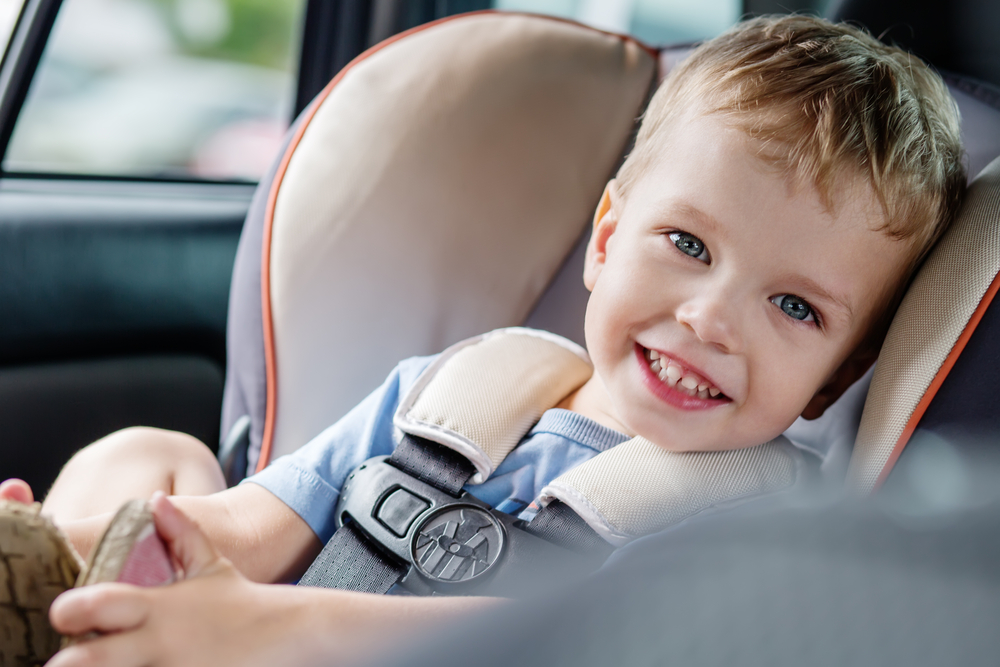
Car seats do an amazing job of keeping kids safe. They’re also extremely complicated to use (that’s why I wrote an entire book to help you do it right). When you’re under time pressure to do it quickly, it’s easy to forget the fundamentals of how to install a car seat properly.
We’ve been there and done that. Pushy drivers, crying babies, slippery seats… the works, sometimes all at once. Take a few minutes to read these tips for how to properly install a car seat fast to prepare yourself and boost your confidence. After all, our #1 job as parents is to keep our kids safe and car seats are one thing we have control of.
Don’t miss these 5 quick car seat installation tips:
Practice and prepare
Don’t be that idiot who cuts the tags off of the new car seat on the airport and then struggles for an hour in the parking lot of the Phoenix rental car depot at 11pm with a crying baby and a cranky husband staring at your every move. Leave that to me.
No, you’re better than that. Make sure you’ve practiced installing your new car seat at least a few times before you find yourself in a high-pressure situation. Peruse the manual. Hop on Youtube and search for [your car seat] and “installation”. Every car seat has its quirks, and it’s so helpful if you can figure them out in advance.
It’s a really good idea to try out both a LATCH install (if your kid is still small enough) and a seatbelt install. You’ll want to have both in your toolkit if you won’t know if advance what kind of car you’ll be installing in.
I do recommend bringing your manual with you. Many car seats have a storage compartment somewhere on the seat itself, but if you’re on the go and don’t have it you can always download it straight from the manufacturers website. In a pinch, the stickers on the sides usually include the basic guidelines like what installation methods work for each direction and weight. There are even small pictures showing the correct position for the seatbelt or lower anchor strap.
Check your stats
ICYMI: Kids grow, sometimes fast.
If you’re traveling with a brand new car seat or one that you only use for travel and have shoved in a closet for the last six months, break it out a few days before your trip. Bring it into your family room and have your kid take a seat.
While they sit in the car seat and watch yet another episode of Daniel Tiger, start adjusting. Check the stickers on the side of the car seat to make sure they still fit in the direction you planned on. Make sure that the shoulder straps are at the right height: just below their shoulders for rear facing, just above the shoulders for forward facing. If your car seat has a no-rethread harness like our convertible car seats then this step is no big deal.
Check to see if the crotch strap needs to be moved out (usually it should be in the slot closest to their body that isn’t underneath them). If the car seat has adjustable hip straps, see if those need to be moved to a wider slot too.
Some of those adjustments can be made while your child is sitting in the car seat. For others, you can eyeball it while they sit in the seat and then adjust after they get up.
After you’ve made all your adjustments, test it out and see if it looks and feels right when your kid is strapped in.
If you find that your child has outgrown rear-facing mode but you still want to install with LATCH forward-facing, move the lower anchor strap to the forward-facing position from the comfort of your own home. On some seats (hello, Evenflo) it can take a few minutes of fiddling to get it done.
If your child has outgrown the forward-facing mode of your combination seat and is mature enough to ride in a booster seat, do the conversion at home for sure. Some of them can take 10-20 minutes the first time around. You may need to consult both your manual and YouTube.
It may sound neurotic to do all that in advance, but I guarantee that it’s easier than installing your car seat in a taxi and then realizing that the harness is set too low.
Go undercover

Once you’re ready to install your car seat, there’s an extremely valuable trick for doing it well and quickly without shedding a drop of sweat (or a tear): go undercover.
By that, I mean go under the cover. This is a trick I learned in my CPST training. Once you have the seatbelt or the LATCH strap through the belt path, tightening it can be a challenge.
If you’re installing with the seatbelt, make sure you’ve locked it. Next, find the place on the car seat cover where you can separate it from the shell closest to where you buckled it. While you push in the seat with your hand (no knees!) pull the seatbelt or the tail of the LATCH strap tight behind the cover.
Why does the make it easier? You have a lot more leverage than if you’re working with the seatbelt all the way at the top. For a LATCH installation, you’ll have the tail parallel to the main part of the strap, which allows it to move more freely through the LATCH connector.
As with all the rest, you’ll want to practice with your own seat in advance to learn its ins and outs. But this method makes it a lot faster to get a tight installation on most car seats!
Special note for overseas travel: If you’ll installing with the seatbelt and you’re in a country where the seatbelts don’t lock (or you can’t be sure in advance) be sure to read this article about locking clips and how to use them.
Know where your top tether is
It’s extremely important to use a top tether for forward-facing car seats whenever possible. It reduces head movement by up to 6″ and can prevent serious injuries. Use your top tether!
“Oh shit, where’s the top tether?” I can’t tell you how many times one of us has said that. You’d think we would have learned by now. I can tell you from personal experience that uninstalling your car seat and then installing it a second time is not as fast as just installing it once.
How can you avoid the double-installation conundrum? Before you start your installation process, flip the top tether strap over to the front of the seat. That serves a few important purposes. First, it prevents the top tether strap from getting stuck behind the seat back. Second, it would be mighty uncomfortable for your kid to rest against it so you’re very unlikely to forget about the top tether altogether.
Keep your cool

Above all, stay calm. In high-pressure situations like installing your car seat in a taxi, Uber or Lyft it’s easy to feel stressed out and like you don’t have time to do it right.
Take a deep breath. You’ve got this. Remember that your child’s safety is more important than an extra two minutes. Just think back to your fundamentals: get the angle right and then make sure the car seat doesn’t move more than 1″ from side to side along the belt path when you give it a firm handshake.
If something doesn’t seem right, don’t let a pushy driver or spouse shake your confidence. Just pause, regroup and do what you need to do – being flustered won’t make you faster!
Pin this to read before your next trip!

Car seat installation FAQs
Every car has unique quirks and plays better with some car seats than others. That said, the Britax ClickTight car seats (One4Life, Marathon, Grow With You etc) are widely regarded as the easiest car seats to install. They’re designed to be installed with the seatbelt and – I swear – it’s easier than LATCH on pretty much any car seat I’ve tried. Open the ClickTight panel, run the seatbelt through it, buckle the seatbelt and remove slack like you would for an adult, then close the panel. That’s it!
Graco offers similar technology in their SnugLock seats like the Triogrow, Tranzitions and SnugRide.
When to install a baby car seat isn’t something you should stress about! I recommend having it in your possession by around 32 weeks and taking that time to read through the manual – make sure you understand the installation options, how to adjust the harness settings and when to remove any extra newborn padding. It’s also a good time to try out installing your seat, before you have an overwhelming belly in the way. Be sure to read your vehicle manual to understand if you’re allowed to use lower anchors in the center or if you’d have to use the seatbelt in that position. Teach any other caregivers – whether your co-parent, grandparent or babysitter – how to install it and check for tightness as well.
I don’t recommend leaving your car seat in the car all that time, though; if you’re in an accident, you’d have to replace the car seat before it’s even used! If you want to install the car seat before baby comes, you can do it around 37-38 weeks. For families starting with an infant car seat, you can consider installing the base but leaving the seat itself in your home.
Where to install the car seat is a common question for parents! While the middle seat is the furthest from any point of impact in an accident, it can sometimes be a tricker spot for correct installation. Some cars don’t allow lower anchors to be used in the center, some cars have weird seatbelt geometry or narrow seats and some middle seats are shallower than outboard seats.
On the other hand, if you’re driving a compact car and have a car seat with a steep recline sometimes the middle seat is the best option from a space perspective. A car seat that’s narrow enough can fit between the front seats so that it doesn’t touch or push against the front seats – which can be dangerous for both your child and anyone riding in the front.
Great news: you don’t really have to “install” a booster seat! A booster seat just positions your child correctly so that the adult seatbelt can keep her safe. The seatbelt holds both your child and the booster seat in place.
Some booster seats come with lower anchors that you have the option to use. These hold the booster seat in place when no one is riding in it so that it doesn’t become a projectile in an accident and injure you (or anyone else in the car). If your booster seat doesn’t have lower anchors, you can buckle the seatbelt through the booster seat as if your child were in it.
Be sure to check your car’s manual and your booster seat manual to find out if they’re compatible. Your vehicle headrests may have certain allowed or required positions when using a booster seat, and your booster seat may its the headrest or its entire back to be in full contact with the vehicle seat. There are many different combinations, so it can take some research, trial and error.
How to install a car seat: the basics
Here’s a quick overview of how to install car seat in most American cars. If you have questions or need more guidance, feel free to contact me.
- Read the manuals
The first place to start is by reading your car seat manual and then your vehicle manual’s car seat section. Here are a few things to look out for:
Vehicle manual:
-Can you use lower anchors in the center seat?
-Where are top tethers located (for forward facing)?
-When using a top tether do you need to raise/lower/remove the vehicle head restraint?
Car seat manual:
-Until what weight are you allowed to install with lower anchors?
-Do you need a certain amount of space between the car seat and the back of the front seat? Can they touch? Can they brace?
-How do you adjust the car seat’s recline and check that it’s properly reclined for your child’s size? - Decide how to install: lower anchors or seatbelt
In the most basic sense, your goal is to attach the car seat to the car along the correct belt path (always the one closest to the vehicle seat back) so that it moves less than 1″ from side to side. Some seats install better with lower anchors and some with seatbelt, and for many it depends on the car and the seating position.
A seatbelt installation is always allowed for American car seats, regardless of your child’s weight, so it’s good to learn how to do it. If your child is light enough, you can also try using the lower anchors to see which one you prefer as long as it’s permitted in the spot where you want to install your car seat. Except for this car seat, you can only use seatbelt OR lower anchors – not both. - Adjust your car seat recline
The correct recline depends on whether your child is rear facing or forward facing, and in some cases on your child’s age or weight. Read the manual for clarification! Find your car seat’s recline indicator – it could be a bubble, ball, line or some other mechanism. Try to get it in roughly the right spot before installing. If you have a young baby and very sloped car seats, you might need to put a rolled towel near the foot of your car seat if the manual allows it.
Pro tip: be sure you’re parked on level ground before you check the recline!
If your car seat comes with an anti-rebound bar, this is a great time to install it. For seats that have a load leg, make sure it’s folded down so you can use it (check your manual for restrictions on positions where you can use the load leg). - Attach the car seat and tighten it
If your child is under your car seat’s lower anchor weight limit and you’re using a seating position that allows it, lower anchors (the “LA” part of “LATCH”) can be really simple: clip in, put a little pressure in the seat, then pull the strap to tighten.
If your child is heavier, you’re using a seating position that doesn’t have lower anchors or you simply prefer it, installation with the seatbelt is always an option when installing American car seats. Run the seatbelt through the belt path closest to the vehicle seat back and buckle it as you usually would. Pull the shoulder belt out as far as you can and then slowly let it feed back into the retractor at the top – you should hear a soft “click click click” as it spools back in, and you shouldn’t be able to pull it back out. Push gently down and back on the car seat while pulling any extra slack out of the seatbelt.
If your car seat comes with ClickTight, SnugLock, True Tension or another lock-off/tension device read your manual because the instructions will be a little different. - Check your work
Your car seat shouldn’t move more than 1″ side to side when you give it a “firm handshake” along the belt path. You don’t need to check anywhere else – other parts of your car seat are expected to move.
Also check to make sure your recline angle to see that it’s still in the allowed range. - Attach the top tether (forward facing)
If your child is forward facing, be sure to attach the top tether to your car’s top tether anchor. Even if your car seat doesn’t require it, the top tether is a critical safety element. It can decrease your child’s head movement by 4-6″ in an accident and prevent injuries caused by striking the seat in front.
It is the most informative post that provide valuable information to the readers. Eagerly waiting for next post.